This page has been added for on-line learning. 2020
Grade Level Lessons
Art Projects K-2
The projects below are for our kindergarten, first and second graders.
Projects can be modified or changed to fit each child's creativity.
A huge THANK YOU to my daughter who helped me color the artwork.
She is an amazing artist and assistant!
**********************************************************************************************
Lesson for K-2
Week of April 6-10
Week One
Illustrators
are the artists that create the pictures in books.
Pictures in a book are called illustrations.
Illustrations can make a book more memorable, fun, and exciting.
While watching and listening to the story,
Guess How Much I Love You, by Sam McBratney
(Illustrations by Anita Jeram),
look at the shapes, lines, and colors the illustrator uses.
We will be using what you see to make our own illustrations!
A Hare of Our Own Illustration
Materials:
Paper, pencil, sharpie (optional), coloring method of your choice (crayon, marker, colored pencils, etc.) If you choose to use paint, you will need a good quality paper.
Do you know the difference between a hare and a rabbit? I'll tell you soon.
Let's get started!
I am using copy paper (since that is what I have handy).
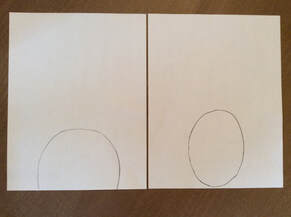
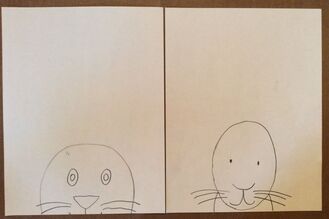
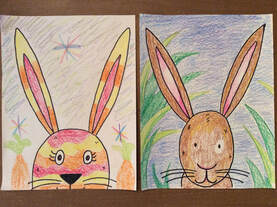
I am going to draw the head of the hare on the bottom of my paper. I willl make two versions.
On one, I am going to make an oval (you can choose to make a circle).
On the other, I'm going to draw a curved line, like a rainbow.
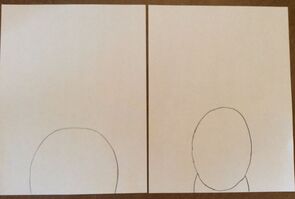
I made a neck for the drawing on the right by adding a short lines on each side of the head. See below.
Now, for the nose. What shape(s) or line(s) can we use for the nose? Anita Jeram used a curved line, like a smiley face.
There are other shapes you can use for your hare's nose (oval, triangle etc.) Choose one that you like.
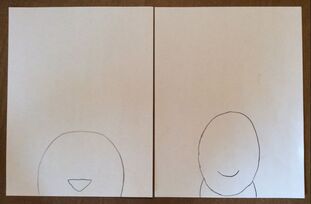
Add a mouth so our hare can eat. You can draw a letter J under the nose, then a backwards J, right next to it.
If you have a special way of making the mouth, you may do that instead.
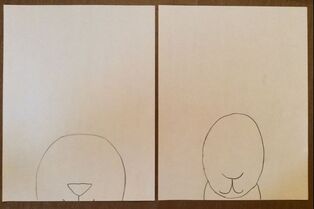
Add the eyes and whiskers.
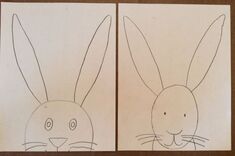
Now, for the ears.
A hare has longer ears and bigger feet than a rabbit.
For the ears, I am going to draw a long, stretched out ovals with pointy tips on the top. I think it looks like a long, stretched-out football shape. I am also going to put a smaller "football" shape in the middle of the ears.
Anita Jeram also added short lines on the face and body to make the hares look more furry.
|
|
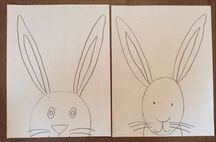
You can outline (optional) and color in your hare illustration! If you outline with a permanent marker, make sure you put another sheet of paper under your drawing, just in case the marker goes through the paper.
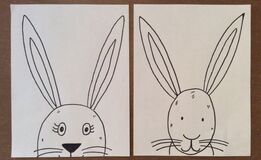
Color you hare! We used crayon.
Want to try something different?
Create a hare drawing from your imagination. Color it in.
Draw a picture of you and someone you love. Color it in.
Create a hare drawing from your imagination. Color it in.
Draw a picture of you and someone you love. Color it in.
********************************************************************
Lesson for K-2
Week Two
A Rainbow of my Own
While watching and listening to the story,
A Rainbow of my Own, written and illustrated by Don Freeman,
look at the shapes, lines, and colors the illustrator uses.
We will be using what you see to make our own illustrations!
While watching and listening to the story,
A Rainbow of my Own, written and illustrated by Don Freeman,
look at the shapes, lines, and colors the illustrator uses.
We will be using what you see to make our own illustrations!
Materials:
Paper, pencil, sharpie (optional), coloring method of your choice (crayon, marker, colored pencils, etc.) If you choose to use paint, you will need a good quality paper.
Paper, pencil, sharpie (optional), coloring method of your choice (crayon, marker, colored pencils, etc.) If you choose to use paint, you will need a good quality paper.
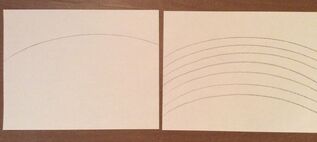
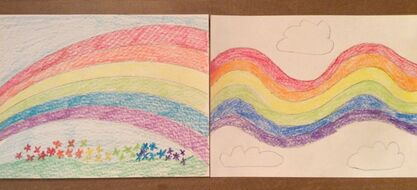
Let's create a Rainbow of our Own!
Using a pencil, draw a line on your paper from one end to the other. The line can be any type of line you want. Straight, wavy, zig-zag, curved etc. Draw 6 more of the same type of line for a total of seven lines.
Color your Rainbow!
Want to have some fun?
Try something different!
Make your rainbow with other fun colors. Try magenta, pink or brown.
Add different patterns and shapes.
Fill the whole paper with rainbow colors.
What can you put in the background? Sun, birds, yourself...?
Try something different!
Make your rainbow with other fun colors. Try magenta, pink or brown.
Add different patterns and shapes.
Fill the whole paper with rainbow colors.
What can you put in the background? Sun, birds, yourself...?
Kermit the Frog is so Musical
The Rainbow Connection
*******************************************************************************************
Lesson for K-2
Week Three
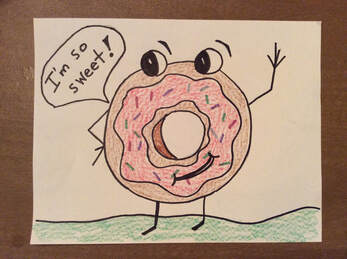
Doughnut Fun Illustration
While watching and listening to the story,
Arnie the Doughnut, written by Chris O'Dowd,
look at the shapes, lines, and colors the illustrator uses.
We will be using what you see to make our own illustrations!
While watching and listening to the story,
Arnie the Doughnut, written by Chris O'Dowd,
look at the shapes, lines, and colors the illustrator uses.
We will be using what you see to make our own illustrations!
Materials:
Paper, pencil, sharpie (optional), coloring method of your choice (crayon, marker, colored pencils, etc.) If you choose to use paint, you will need a good quality paper.
Paper, pencil, sharpie (optional), coloring method of your choice (crayon, marker, colored pencils, etc.) If you choose to use paint, you will need a good quality paper.
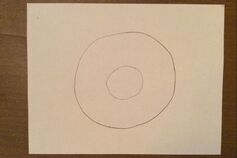
Let's get started and create our own Doughnut!
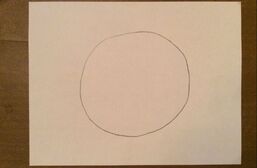
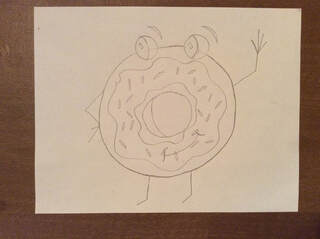
I am going to use a circle shape for my doughnut (I love Arnie's roundness). However, you can choose another shape if you want (oval, circle, a square with rounded edges etc.).
Draw a circle in the center of your paper. About the size of a large grapefruit. Find the center of the circle and draw a smaller circle inside.
If you want to trace something round, go ahead.
Draw a circle in the center of your paper. About the size of a large grapefruit. Find the center of the circle and draw a smaller circle inside.
If you want to trace something round, go ahead.
|
|
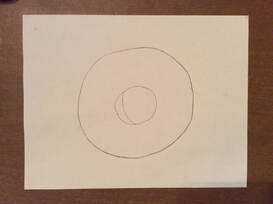
Optional: if you draw a line in the center of the doughnut it creates a more 3D doughnut. See example below.
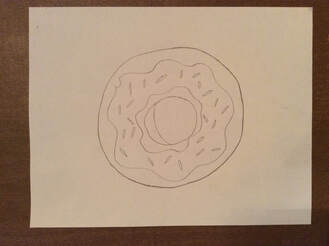
Add your favorite doughnut toppings. Sprinkles, chocolate etc.
|
|
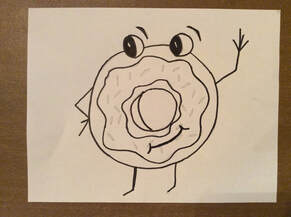
Want to make your doughnut have a personality? Give it eyes, lashes, a nose, mouth, freckles, glasses etc. Use your imagination.
|
|
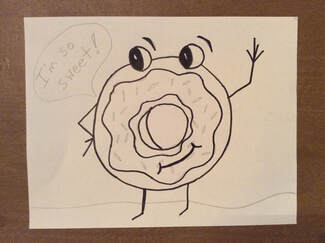
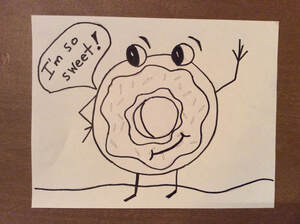
Does your doughnut has something to say? Add a speech bubble.
|
|
Color your doughnut!
Want to try something different?
Give your doughnut a name.
Make a comic strip starring your doughnut.
Draw a few doughnuts with different toppings.
Put your doughnut in different locations such as: on a plate, at the beach or with it's family....
Have Fun!
Give your doughnut a name.
Make a comic strip starring your doughnut.
Draw a few doughnuts with different toppings.
Put your doughnut in different locations such as: on a plate, at the beach or with it's family....
Have Fun!
*******************************************************************************************
